Showing posts with label Tart. Show all posts

Tuesday, July 31, 2012

Tomato Pesto Tart


This is a tart but it’s not dessert. I KNOW. Rumor has it this is a thing people do – put thought and effort and planning into making non-dessert food. 


I wanted to make something seasonal and pretty for my party a couple weekends ago, so I put on my thinking hat and meandered over to my farmer’s market. The tomatoes at Eastern Market are ridiculously delicious, which I know thanks to the fantastic farmer’s market free samples. Tomato slices with a sprinkling of salt = summertime swoon. 

As I paced past the stalls, my mind ran through some appetizer options -- Pizzas? Crostini? Quiche? Kebabs? Something not toooooo time/effort-intensive, that would be good at room temperature...hmmmm. 


I bought four big heirloom tomatoes (two red and two yellow), along with a clove of garlic, bunch of basil, and a bag of walnuts. Tomato Pesto Tart. Whole Wheat Olive Oil Crust. And a little bit of egg and parmesan to hold it all together. YES. 

I usually make walnut pesto because a) I like it, and b) walnuts are significantly cheaper than pine nuts. My recipe (below) makes enough pesto to have some extra (super-easy dip: ¼ cup pesto + 1 cup Greek yogurt = serve with beet chips!). But you could definitely make things easier on yourself and use jarred pesto instead.

Tomato Pesto Tart


Olive Oil Tart Crust
Adapted from Pastry Affair.
  • 1 cup whole wheat flour 
  • 1 cup all-purpose flour 
  • 1 teaspoon fine sea salt 
  • 1 teaspoon dried basil (optional)
  • 1/3 cup olive oil 
  • 1/3 cup cold water, plus extra if necessary
  1. Preheat oven to 350 degrees (175 degrees C). Spray or butter a 10-inch tart pan.
  2. In a medium bowl or food processor, mix the flours, salt, and basil. Add the olive oil and water and use your hands to mix until it comes together (or if you’re using a food processor, pulse with a regular blade until begins to come together.) If it’s not coming together, add more water in teaspoon increments until it forms a ball. The dough should not be sticky and wet.
  3. On a lightly floured surface, roll out dough to form a 12 inch circle. [Turns out I don’t have a rolling pin, so I used a bottle of wine to make a rough circle-ish, then transferred it into the tart pan and just kind of pressed it into shape. Rustic. #win] Transfer to tart pan, and press into the sides. Prick the dough with a fork before baking. Bake for 20 minutes before removing and allow to cool slightly before filling.
Walnut Pesto
Yield: ¾ cup
  • 2 cups tightly packed basil leaves
  • ½ cup walnuts
  • 2 cloves garlic (peeled and coarsely chopped)
  • ¼ cup extra virgin olive oil
  • 1 tablespoon lemon juice (optional)
  • Salt and pepper
  1. Toast walnuts either on the stove or in the oven until they start to smell nutty (pay attention -- the line between deliciously toasted and burnt is very fine! This is not the time to get sidetracked!).
  2. In a food processor or blender, process all the ingredients until smooth. (You can make the pesto in advance - just keep it sealed and refrigerated.)
For the filling:
  • 4 medium or large-sized tomatoes, sliced (I used red and yellow)
  • ½ cup Walnut Pesto (recipe above)
  • 2 eggs
  • 1 tablespoons milk
  • 2 tablespoons Parmesan cheese, plus a bit more to sprinkle on top
Assembly:
  1. Spread pesto evenly in the bottom of the slightly cooled tart crust.
  2. Arrange tomato slices on top of the pesto.
  3. Whisk together eggs, milk, and parmesan, and pour over tomatoes. 
  4. Bake for about 30 minutes, or until the eggs set. 
  5. Sprinkle remaining Parmesan on top for serving.


Isn't it beautiful!?! Also, this tart, re-heated in a toaster oven, makes excellent lunchtime leftovers!


Tuesday, June 19, 2012

Cake of the Week: Rustic Rhubarb Tarts

I cannot get these Rustic Rhubarb Tarts out of my head. Maybe my judgment is clouded by the consumption context (stoop-time on a perfect summer evening with three of my absolute favorite people after eating pesto pizza), but I really think this is the best dessert I’ve ever had. 


LLC has been winning at dessert baking recently, which means that as the primary eater of her efforts, I’ve been winning as well.


Let’s start with the crust. If I could eat this crust – encasing everything from fruit to vegetables to cheese to eggs  – every day for the rest of my life, I would be completely content. It is hands-down the lightest, buttery-est, most delicious thing in the world. It has corn flour and a little bit of fine cornmeal, which I suspect adds to the texture and buttery flavor (you know how good fresh corn can taste like butter?).

(before cooking)
And then the filling. Well, we all know how I feel about rhubarb, so clearly it’d be hard to go wrong with this. The original recipe is an only rhubarb compote, but LLC went with strawberry rhubarb instead. Strawberries and chunks of tart rhubarb-y goodness. Not too too much sugar, so the tarts stay tangy.

And, in notes from the baker: “rustic” is the best adjective to put in front of any dessert you ever make. It’s like a baking free pass. Those cookies aren’t shaping up the way you expected? Call them rustic. Worried the crust won’t turn out perfect? Rustic. Plus in this age of farmers markets and foodie-isms, “rustic” is a shabby-chic adjective that is sure to draw a crowd.


No rolling pins, no tart rings, no damn-this-crust tears when it doesn’t come out perfect (ok maybe that’s just me). And the name is alliterative (ok, again, maybe just a thing for me): Rustic Rhubarb Tarts. Do it.

Rustic Strawberry Rhubarb Tarts

(Adapted from Smitten Kitchen.)
Corn Flour Crust
  • 1 cup corn flour
  • 1 cup all-purpose flour
  • 1/2 cup fine cornmeal
  • 1/4 cup plus 2 tablespoons sugar
  • 1 teaspoon Kosher or coarse salt
  • 1 stick (4 ounces) cold unsalted butter, cut into small pieces
  • 1/4 cup plus 2 tablespoons heavy cream
  • 2 egg yolks
  • 1 batch Strawberry Rhubarb Compote (recipe below)
If you’re using a food processor: Combine the dry ingredients in the work bowl of your food processor. Add the butter and pulse in short bursts, until the mixture resembles coarse cornmeal. Add heavy cream and egg yolks and pulse until combined; it will look crumbly but it will become one mass when kneaded together.
OR
If you’re using a stand mixer: Whisk the dry ingredients in the bowl of a stand mixer. Using the paddle attachment, add the butter and turn the mixture speed to low (you’ll want to lock the top, so the mixture doesn’t fly about) and mix to break up the butter. Increase the speed to medium and mix until the butter is as coarse as cornmeal. Add the heavy cream and egg yolks and mix until combined. The dough will look crumbly but when pinched between your fingers, it will come together.
OR
By hand: The butter can also be blended into the dry ingredients with a pastry blender, or you fingertips. The cream and egg yolks can be mixed into the butter mixture with a wooden spoon. You’ll likely want to turn the dough out onto a counter to gently knead it into one mass.

Strawberry Rhubarb Compote
  • 1 lb strawberries, rinsed and hulled
  • 1 lb rhubarb, trimmed
  • 1 lemon
  • ¾ cup granulated sugar 
  1. Select about 4 ounces of the smallest strawberries and cut lengthwise into quarters. These will be added raw to the cooked compote; set aside.
  2. Cut the remaining larger berries in halves or quarters so that the pieces are about the same size. (You should have about 2 1/2 cups.) Place them in a medium saucepan.
  3. With a paring knife, pull away and discard the strings that run the length of the rhubarb stalks. Cut the stalks into 3/4-inch pieces (you should have about 3 cups) and add to the saucepan.
  4. Use a fine grater or a Microplane to zest the lemon. Add 1 teaspoon of the zest to the pan. Squeeze 1 tablespoon of juice and add it to the pan. Add the sugar and stir to coat the fruit.
  5. Place the pan over medium-high heat and cook, stirring often to dissolve the sugar. By the time the sugar has dissolved, the fruit will have released a lot of juice. Boil for about 4 minutes to reduce the liquid somewhat, then reduce the heat and simmer for another 2 minutes, or until the rhubarb is soft. Don’t worry if some of the rhubarb falls apart.
  6. Take pan off the stove and stir in reserved strawberries. Cool to room temperature, then refrigerate in a covered container until cold. (This makes about 4 cups of compote, but the extra will keep for a couple of weeks and is delicious for breakfast.)
Shape the tarts: 
  1. Divide the dough into 10 equal pieces. Lightly flour a work surface and using the heel of your hand, flatten the dough into a rough circle. Continue flattening until it is approximately 5 inches in diameter. Try to work quickly, so the dough doesn't get too warm and soft, making it harder to handle. For more elegant edges, gently flatten the outer edge of the circle with your fingertips, making it thinner than the rest of the dough.
  2. Spoon 3 tablespoons of the Strawberry Rhubarb Compote into the center of the dough. 
  3. Fold the edge of the dough toward the compote and up, to create a ruffled edge; continue around the perimeter, letting the ruffles be their bad irregular selves. 
  4. Slide a bench scraper or spatula under the tart and transfer it to a parchment-lined (or cooking-sprayed) baking sheet. Continue with the remaining dough. 
  5. Freeze the tarts on their tray for at least 1 hour or up to 2 weeks, wrapped tightly in plastic.
Bake the tarts: Preheat over to 375°F. Bake tarts, still frozen, for about 35 minutes or until the edges of the tarts are brown and the rhubarb is bubbling and thick. Serve warm or at room temperature. The tarts keep in an airtight container for up to 2 days.

(I ate mine with a dollop of Greek yogurt. If only we had whipped cream or ice cream...)


Tuesday, May 24, 2011

Cake of the Week: Fresh Strawberry Tart


Last weekend SpeedyKate referred to me as her hippie friend “but in a good way,” and I quickly realized she’s right. I come from a family of unintentional hippies. You wouldn’t necessarily know it by looking at us, but we do exhibit all the key NorCal/local/environmental/peace and love traits (but my Dad would be horrified if you called him a hippie - sorry Dad!).


Upon entering the real world I was shocked to learn that not everyone recycles and turns off all lights when leaving the room, that many people don’t understand how chickens lay eggs, or know that fruits and veggies have seasons.


My family’s hippy-ness is most apparent in our food. My “comfort food” is fresh salsa made from home-grown tomatoes, and strawberry pie made from the berries grown in the planter beds my mama built in our backyard. In the fishing season, my dad would bring back striped bass and rainbow trout for dinner or to smoke (yumm!). Boxed mac and cheese was an only-when-there’s-a-babysitter special occasion thing, eggs came from our chickens (living in the coop my Mama built – so crafty she is!), and soda never happened.


My parents didn’t take it to the no-TV, no-sugar, no-fast food extreme (we ate In-N-Out every weekend on the way to Tahoe), which is why we don’t qualify as true hippies, just totally cliché Northern Californians.


Anywho, when I was in elementary school when we had the most prolific strawberry beds ever. We’re talking about so many strawberries that picking then became a chore and my Mama had to come up with creative ways to use them all up.


Enter the Strawberry Tart (my mama made it in pie form, but I went for the tart version). The filling is almost 100% strawberries – no fat, no filler, just sweet red awesomeness. This recipe is so easy, and it looks and tastes like a summer afternoon. You can serve it plain, or top with whipped cream or ice cream.


Strawberry Tart

Tart shell: (this is the same recipe from my Ricotta Tart)
1 cup AP flour
1/4 cup sugar
1/2 tsp salt
1 stick cold unsalted butter, cut into pieces
1 egg yolk
1 tsp vanilla extract
1 tbsp water


Preheat oven to 375 degrees.  Liberally butter a 11" tart or quiche pan and set aside.
In the bowl of a food processor, combine flour, sugar and salt.  Pulse to combine.  Add butter pieces and pulse until fine crumbs form.  Add yolk, vanilla and water.  Pulse in quick bursts until dough forms a ball.  Press dough into buttered pan (flour hands if your dough is sticky). Chill shell for 40 minutes.

After chilling, prick the tart shell with a fork and bake for 30 minutes.  Let shell cool completely before filling.
 
Filling:
2 quarts fresh strawberries
½ cup sugar
1 ½ tablespoons cornstarch
¼ cup water


Mash or briefly food-process about ½ quart strawberries (you want enough to make about 1 cup mashed/chopped berries).

In a saucepan on the stove over medium heat, combine sugar, cornstarch, and water. Heat for 2 minutes, then add the mashed/chopped berries. Bring the mixture to a simmer, wisking constantly. Simmer for 1-2 minutes, until the mixture begins to thicken. Remove from heat and cool for 5 minutes.

Cut the rest of the strawberries in half and set aside.

Assembly:
Spread a thin layer of filling inside the cooled tart crust.


Arrange the halved berries on top of crust.


Using a spoon and spatula, evenly spread filling/glaze over the fresh berries.
Chill in the refrigerator at least 30 minutes before serving.


Enjoy!

Tuesday, April 19, 2011

Cake of the Week: White Ricotta Tart

Once, while in a “diet phase” in high school, I made a ricotta cheesecake as a “healthy alternative” to regular cheesecake. I hated it. I wanted/expected an exact replica of the smooth creamy richness of cheesecake that I love so much. So when I put a forkful of ricotta-textured cheesecake in my mouth I was totally bummed. I said never again to the ricotta option and left it at that.


Fast-forward 7 years to winter 2011. I saw this post on Sprinkle Bakes, and in typical Mollie fashion gasped out loud and immediately sent it to all my friends – Want! Need! Have to have!

LLC made the White Ricotta Tart for a book club meeting and served it with mixed berry compote. Swoon! I was sold and back on the ricotta train, signing up for a lifetime ticket.
 
Last week I finally unpacked my food processor (yay!), figured out how to turn it on (harder than you might expect), and conquered crust-making! I made this White Ricotta Tart for a birthday party Friday night – Happy Birthday Nikki! 

Each guest brought a snack, so I cut the tart into bite-sized pieces and put each piece in a mini cupcake liner. (Plus a test-piece for myself...shhhhh!)

Everyone loved it! The recipe is super easy, so make it for yourself and all your friends! 

The original includes a recipe for sugared fruit, and LLC served it with fruit compote. I served it plain and it was great – this tart can definitely hold it’s own.

(Since I was baking mid-week, there are no glossy Photoman pictures to be had…sorry. I did my best but clearly failed, so I have just two of my pics to prove that I made it, and then borrowed from Sprinkle Bakes. And the flowers are just for fun - DC is gorgeous right now!)


White Ricotta Tart

Tart shell:
1 cup AP flour
1/4 cup sugar
1/2 tsp salt
1 stick cold unsalted butter, cut into pieces
1 egg yolk
1 tsp vanilla extract
1 tbsp water
Preheat oven to 375 degrees.  Liberally butter a 11" tart or quiche pan and set aside.
In the bowl of a food processor, combine flour, sugar and salt.  Pulse to combine.  Add butter pieces and pulse until fine crumbs form.  Add yolk, vanilla and water.  Pulse in quick bursts until dough forms a ball.  Press dough into buttered pan (flour hands if your dough is sticky). Chill shell for 40 minutes.
After chilling, prick the tart shell with a fork and bake for 20 minutes.  Let shell cool completely before filling.
Filling:
4 oz cream cheese, softened (low fat or no fat, if you like)
2/3 cup sugar
Pinch of salt
1 1/4 cups part skim ricotta cheese
3 egg whites
1 vanilla bean, seeds reserved and hull discarded (I just used 1 teaspoon vanilla)

Combine softened cream cheese, ricotta, sugar and salt in a large bowl.  Cream together with an electric hand mixer. Add egg whites and vanilla seeds.  Mix at medium speed until combined.  Pour into cooled tart crust and bake for 20 minutes

Tuesday, January 18, 2011

Cake of the Week: Citrus Tart

Winter can be dreary. Gray skies, freezing rain, icy winds and swirls of snow. I wear full length dark coats on top of sweaters, knee socks under boots, tights under jeans. I can’t resist sleeping in late, curled under blankets, dreading the outside.


And winter food can be just as heavy and dark. Gone are the days of a light summer salad – instead we have chilis and stews, big bowls and steaming pasta. But there is a bright light in this mid-January darkness. It’s sweet and juicy, brilliant and sunny, and it’s only in season in the winter! This is Mother Nature’s consolation prize in a food-scape of kale, parsnips, and all those canned/frozen/preserved relics of summer and fall.


Ta-DA! I give you the glorious grapefruit! In a Citrus Tart! It’s radiantly shiny, bringing light and joy to an otherwise gray January.


Grapefruit, named for how it grows in bunches, is a notoriously healthy breakfast, scooped out of its peel with a serrated spoon. But there is so much more to this tangy fruit than just a non-fat snack! Try it on a tart? Peeled and sectioned on top of buttery crust and rich citrus curd (or custard – call it what you will – the difference is in the quantity of citrus juice - curd has more).


I combined my grapefruit with oranges, to mellow it out a bit and add some extra color, but pure grapefruit would be fine too.


This recipe was inspired by Southern Living. I made Sprinkle Bakes’ tart crust, and then followed the Southern Living recipe for the rest of it. It was actually very easy – just a little time-consuming. Keep in mind that you have to make the dough, then chill it. Then cook the crust and cool it. Also, the Buttery Citrus Curd is supposed to chill for 8 hours! But mine only did for about 2 hours, and it turned out fine.


PhotoMan came over to hang out...and I may have made him go home to retrieve his camera (what can I say? This was too good a food-photography opportunity to pass up!). Plus a non-chocolate citrus dessert is exactly his sort of thing. This tart makes a great dessert, afternoon, snack, and could even be served at brunch!

Citrus Tart

Tart shell:
1 cup all-purpose flour
1/4 cup sugar
1/2 tsp salt
1 stick cold unsalted butter, cut into pieces
1 egg yolk
1 tsp vanilla extract
1 tbsp water
Preheat oven to 375 degrees.  Liberally butter a 11" tart or quiche pan and set aside.
In the bowl of a food processor, combine flour, sugar and salt.  Pulse to combine.  Add butter pieces and pulse until fine crumbs form.  Add yolk, vanilla and water.  Pulse in quick bursts until dough forms a ball.  Press dough into buttered pan (flour hands if your dough is sticky). Chill shell for 40 minutes.
After chilling, prick the tart shell with a fork and bake for 20 minutes.  Let shell cool completely before filling.

Buttery Orange Curd (Filling) - (Looks kinda gross, tastes fantastic!)
Total: 8 hours, 15 minutes
Yield: Makes about 2 cups
Ingredients
2/3  cup  sugar
2 1/2  tablespoons  cornstarch
1 1/3  cups  orange juice (I used pulp-free)
1  large egg, lightly beaten
3  tablespoons  butter
2  teaspoons  orange zest
Pinch of salt
Preparation
1. Combine sugar and cornstarch in a 3-qt. saucepan; gradually whisk in orange juice. Whisk in egg. Bring to a boil; boil, whisking constantly, 3 to 4 minutes.
2. Remove from heat; whisk in butter, zest, and salt. Place heavy-duty plastic wrap directly on curd (to prevent a film from forming), and chill 8 hours. Store leftovers in refrigerator up to 3 days.

Tart Assembly
Peel and section about 5-9 assorted citrus fruits (See below for how to section citrus - it's harder than it looks on TV!). The amount of fruit depends on their size - I used 3 large grapefruit, and 4 oranges.


Spread Buttery Orange Curd over completely cooled crust. 
Top with citrus sections.


How to Section Citrus:
1. Cut off top and bottom.

2. Cut off peels on the sides so that fruit is exposed.


3. Carefully cut along the skin between sections to get the fruit out in sections without any white stuff attached. 

Wednesday, October 13, 2010

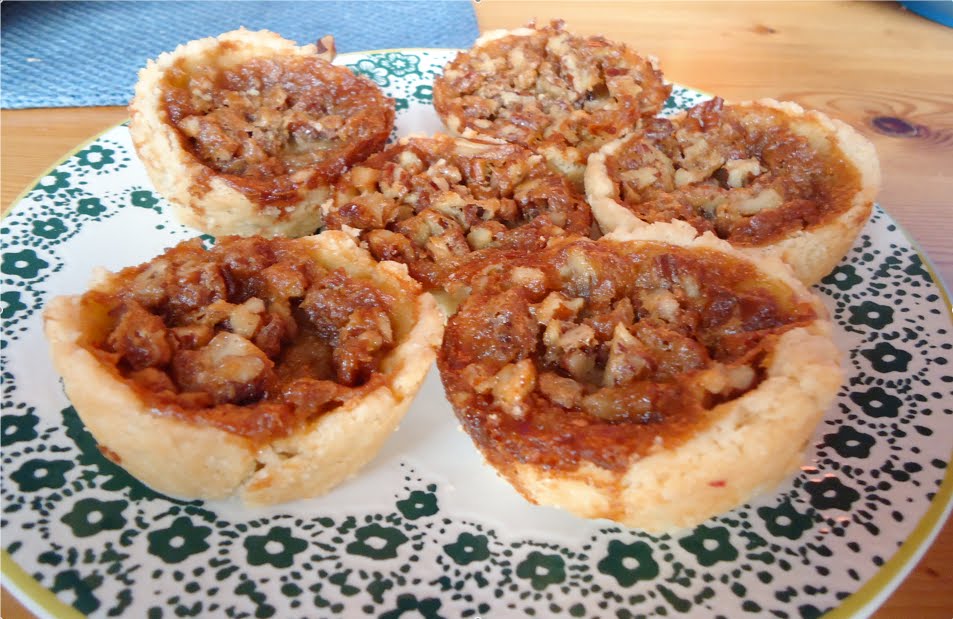
Cake of the Week: Butter Tarts

I first experienced these tarts of buttery nutty goodness at the LOTR Hobbit Party (they pair quite nicely with Cakeballs!). And then they mysteriously appeared in my fridge after a long Tuesday’s workday.

Do you believe in the butter tart fairy? Out there looking over us, delivering rich and nutty cups of awesomeness to those most in need?

I do.

I believe she’s looking out for my sweet tooth, creating late-night butter tart-storms in my kitchen. I believe she is the pixie of pastry, the bogie of butter, the nisse of nuts, the siren of sugar, and the goddess of goodness in butter tart form!

Basically, she's LLC - reliably bringing me baked goods whenever I'm not baking myself. 

So here’s the recipe, if you feel the urge to become a Butter Tart fairy yourself...

Butter Tarts from Joy of Baking

Pate Brisee (Short Crust Pastry)

1 1/4 cups (175 grams) all-purpose flour

1/2 teaspoon salt

1 tablespoon (14 grams) granulated white sugar

1/2 cup (113 grams) unsalted butter, chilled, and cut into 1 inch (2.54 cm) pieces

1/8 to 1/4 cup (30 - 60 ml) ice water

Butter Tart Filling:

1/3 cup (70 grams) unsalted butter, softened

1 cup (215 grams) light brown sugar

2 large eggs

1 teaspoon pure vanilla extract

1/4 cup (60 ml) light cream (half-and-half) (10% butterfat)

1/2 cup raisins or 1/2 cup pecans or walnuts (toasted and chopped) (optional)


Pate Brisee:  In a food processor, place the flour, salt, and sugar and process until combined. Add the butter and process until the mixture resembles coarse meal (about 15 seconds). Pour 1/8 cup (30 ml) water in a slow, steady stream, through the feed tube until the dough just holds together when pinched.  If necessary, add more water. Do not process more than 30 seconds.

Turn the dough onto your work surface and gather into a ball. Flatten into a disk, cover with plastic wrap, and refrigerate for about one hour before using. This will chill the butter and relax the gluten in the flour. 

After the dough has chilled sufficiently, place on a lightly floured surface, roll out the dough and cut into 12 - 4 inch (10 cm) rounds. (To prevent the pastry from sticking to the counter and to ensure uniform thickness, keep lifting up and turning the pastry a quarter turn as you roll (always roll from the center of the pastry outwards).) Gently place the rounds into a 12-cup muffin tin. Cover and place in the refrigerator for about 30 minutes to firm up the dough. Next, make the filling.

Butter Tart Filling: In the bowl of your electric mixer, or with a hand mixer, cream the butter and sugar. Beat in the eggs, one at a time, and then the vanilla extract. Stir in the cream. If using nuts and/or raisins, place a spoonful in the bottom of each tart shell and then fill the unbaked tart shells with the filling. Bake at 375 degrees F (190 degrees C) for about 15 - 20 minutes or until the pastry has nicely browned and the filling is set. Remove from oven and place on a wire rack to cool. Serve at room temperature or chilled.

Makes 12 - 4 inch tarts.

Brush up on your Butter Tart trivia by listening to this CBC radio program. 

Tuesday, September 14, 2010

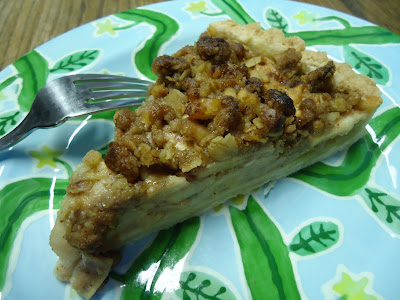
Cake of the Week: Caramel Apple Tart with Cinnamon Walnut Streusel

I think I’ve passed a growing up milestone in my life. Like my first Junior High dance, or when I got my job, or the time I “handled” a cockraoach situation in my apartment (btw that is a GREAT story, but it has no place on my lovely G-rated baking blog). 

Basically, I made crust. And it was good. And it wasn’t stressful. I didn’t scream or cry or whine (LLC can attest to this). And I may do it again voluntarily. So look at me - so adult, so mature!

This crust has changed my life. And this tart just may change yours.

For Emily’s birthday Jess and I made a semi-disastrous but ultimately delicious Caramel Cake (read about it here). There was a lot of leftover caramel, sitting in my fridge, just begging to be eaten with a spoon (which I totally did until I had to tell myself ENOUGH! Make something instead!).

So here it is, my creation in celebration of the feeling of fall in the air. Caramel Apple Tart with Cinnamon Walnut Streusel.

Basically it’s tart crust, filled with apple slices mixed with caramel, with butter/brown sugar/cinnamon/walnuts sprinkled on top. The soft tartness of the baked apples balances perfectly with the sweet and rich caramel, and the crunchy topping gives it that nutty something extra that takes it from good to omgsogoodicanbarelyhandleit. Top it with French vanilla ice cream to be transported to a place you didn't think tart could take you...

Tart crusts tend to be dry and chalky (ick), but this one came out just right. It’s somewhere between a sugar cookie and a pie crust. Thank you Sweet Pea for bringing this crust into my life!

Caramel Apple Tart with Cinnamon Walnut Streusel

For the crust:

1 1/2 cups all purpose flour

1/8 teaspoon salt

1/2 cup unsalted butter at room temperature

1/4 cup granulated white sugar

1 large egg, lightly beaten

2 tablespoons water (as needed)

Beat butter until softened (you can do this by hand or with a mixer). Add sugar and beat until light and fluffy. Beat in the egg. Add dry ingredients and mix until dough forms a ball, add water if your crust is too dry.

Flatten the pastry into a disk, cover with plastic wrap, and refrigerate for 20 minutes or until firm.

Remove dough from refrigerator, unwrap and roll out on a lightly floured surfac. Transfer to an 11 inch tart pan with removable bottom by lightly rolling the pastry around the rolling-pin, dusting off any excess flour as you roll. Unroll the dough on top of tart pan. (Ok this part didn’t work for me. The crust totally fell apart as I transferred it. But it doesn’t really matter! You can just press the dough together once it’s in the tart pan and you’re good to go!) Working around the circumference of the pan, ease the dough into the pan corners by gently lifting the edge with one hand while pressing it into the corners with the other hand. Press the dough against the fluted sides of the pan. Roll the rolling-pin over top of pan to get rid of excess pastry. Prick bottom of dough with a fork to prevent the dough from puffing up as it bakes. Refrigerate for 20 minutes.

Preheat oven to 400*. Bake the crust for 10 minutes.

For the Filling:

4 large Granny Smith apples, thinly sliced

1 teaspoon cinnamon

2 teaspoons flour

½ to 3/4 cup caramel sauce (depending on how sweet you want it)

Mix all filling ingredients together until evenly coated.

For the Streusel:

½ stick butter (aka ¼ cup), softened

½ cup flour

1/2 cup oats

¼ cup dark brown sugar

1 teaspoon cinnamon

½ cup chopped toasted walnuts

Pile filling into crust. Use a fork to mix up streusel ingredients until they're crumbly. Sprinkle streusel evenly over the top. Bake at 400* for 35 minutes.

And another awesome thing to say about this tart - it travels really well! My roommates and I enjoyed a few slices, then I let it cool completely in my fridge. The next morning, I sliced it up, wrapped the pieces in plastic, and conducted drug-trade-like tart transactions throughout the day with various friends who work in the area. They'd better love me, right?